Hardware and firmware organization: the foundation of an AI device on the ESP32-S3
🟠 In this article, I'll explain the hardware I'm using in my AI device project, why I chose it, and how I structured the firmware in Rust.
This is the foundation of the entire project: the MCU, display, controls, and a minimal firmware skeleton that ensures modularity and expandability.
What I'm building and why hardware matters
The project is an ESP32-S3-based AI device that determines the probability of a person being in front of a camera. It can:
- collect data from sensors (OV2640 camera);
- perform local AI inference (TinyML);
- display debug data (16x2 I2C OLED);
- accept user input via a button;
- send data to the backend (Actix Web);
Choosing an MCU: Why the ESP32-S3 Sense
The main parameters influencing the choice of a microcontroller for this project were a powerful core, RAM and Flash memory capacity, and a Wi-Fi module.
I chose the XIAO ESP32-S3 Sense for three reasons:
- The Sense has a pluggable camera module that can be upgraded if needed.
- Improved AI performance based on the dual-core 32-bit Xtensa LX7 processor.
- 2.4GHz Wi-Fi with multiple power consumption modes.
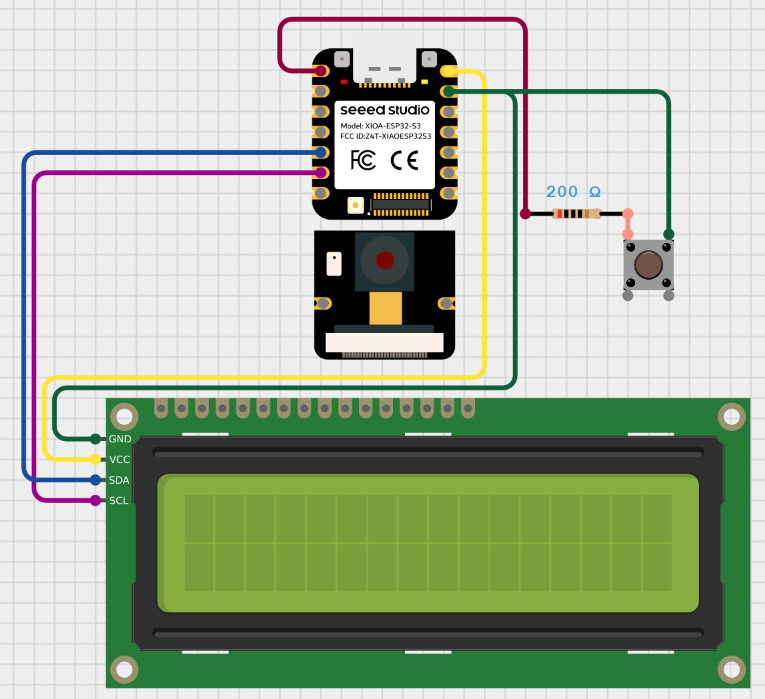
In addition to the chip, I needed a breadboard for easy prototyping, cables, an LCM1602 OLED 16x2 display (I²C), and a simple pull-up button with a resistor.
Conceptual connection diagram
DevJournal: The Journey from Idea to Working Prototype
Development always begins with a simple impulse—an idea that catches your attention.
For me, this impulse was the desire to implement something complex yet interesting, something I hadn't encountered before.
But the path from "it would be cool to do" to the actual result is rarely straightforward.
In this section, I'll highlight quotes from my development journal, which I kept throughout my work on the system.
It reflects my natural, living process: experiments, setbacks, sudden insights, periods of chaos, and moments when everything came together as a system.
In a way, it's an honest record of how my thinking evolved, how a working approach is formed and reimagined, and why small steps are more important than big breakthroughs.
- The Exploration Period: Adaptation and Restructuring
At first, chaos sets in: testing ideas, making small, hesitant edits, searching for reference points, and trying to understand what's going on.
While navigating this chaos, it's easy to find yourself overwhelmed by a good hundred lines of code from experiments and various hypotheses. It was at this stage that one of the key skills emerged: the ability to stop, look at the system's state, and roll back to a stable point.
"Adapt, roll back to a stable point, and replan again. Repeat the controlled attempt one more time."
- The Period of Internal Support: The Emotional Side of Engineering
I've had periods when I spent weeks solving a single problem, approaching it from every possible angle, searching and asking questions on forms, taking everything apart and putting everything back together, becoming depressed, and more than once wanting to quit. I think this is a familiar feeling for any mature developer who challenges themselves.
Technical progress is impossible without emotional stability, because any developer burns out not from the complexity of the tasks, but from their attitude toward them.
At this stage, my "inner developer-mentor" is more deeply formed—one who carefully guides rather than criticizes.
"I try to support myself, without pressure... gently return to the flow without destruction or self-recrimination."
- Practice Period: Transition to Action
Every non-trivial project developed alone turns into a "mountain of tasks."
I stopped waiting for the perfect moment of motivation and energy and simply started working with what I had. Work flows when there's no paralysis of choice.
Rejecting perfectionism accelerated my development without losing quality and turned the project into a series of small victories—and these are far more important than a fragile ideal, which is often unattainable and remains only in the mind.
_"I try to simply try without perfection, but sometimes the amount of work ahead overwhelms me..."
DevJournal: Engineering Wilds
- Start: Basic Firmware
Development began with the basic firmware: to get the ESP32-S3 up and running with its two coprocessors, I used the community-supported starter template 'esp-idf-template'. This allowed me to quickly assemble a minimal working project, flash an LED, and move on.
When starting out, it's best to use tested templates – this saves a ton of time and allows you to focus on the logic rather than the basic setup.
-
Camera and Dataset Collection
The next big step was connecting the camera and receiving frames on the PC via UART. I ran a TCP server on the chip, and a client-side script that, upon connection, began receiving frames and saving them to disk. In addition to visually debugging the camera, I began collecting a dataset of frames in the target 160x120 grayscale format. UART limitations and the need for a USB connection pushed me to set up Wi-Fi. -
Wi-Fi and Network Configuration
To implement Wi-Fi, I usedesp_idf_svc::wifi. Then I set up configuration storage in NVS and implemented a basic QR code procedure for entering settings. Over time, the project became overgrown with "spaghetti" code—the file structure became disorganized, making it difficult to navigate. Modules became confused, and warnings arose. This prompted me to consider refactoring, cleaning up the logic, and restoring modularity.
If the project grows, don't be afraid to refactor: moving modules, cleaning up the spaghetti, and creating a clear structure. It pays off handsomely.
- Modeling: First Attempt
Next, I started training a face recognition model using the CelebA dataset as a basis. The first model turned out to be undertrained, so I had to expand the data by adding the WIDER FACE and PASS datasets and my own samples, as well as strengthen the augmentations and prepare a processing pipeline.
However, the final model turned out to be too large – almost a megabyte.
After quantizing to int8, the model required allocating ~19 MB of arena space, which is unachievable for the ESP32.
I then redesigned the architecture and redesigned the model so that the final weight size would be around 100 KB – this provided a better balance between accuracy and size.
Model weight is a critical parameter for an MCU. It's better to plan a compact model + aggressive preprocessing in advance.
-
Optimization and Preprocessing
During development, I had to solve many minor technical issues: time synchronization via SNTP, displaying custom characters on a 5x8 LCD, selecting the camera resolution for QR mode, and optimizing the frame rate.
After several iterations, I managed to implement a compact model (~37 KB): I updated the frame preprocessing, added antialiasing, a median filter, a dynamic brightness threshold, and a check for frame differences to avoid running inference if the frame hadn't changed. This improved stability and reduced power consumption. -
Critical Bug: Freezing after a Power Cycle
A serious problem arose: after a full power outage, the model would "freeze": the predictions would become identical, regardless of the input data.
Everything worked correctly on a clean firmware, but after a reboot, it crashed.
After errors like "Guru Meditation," suspected stack overflows, allocator errors, defragmentation, and DRAM/PSRAM conflicts, we were able to identify the issue as being in arena allocation.
The solution was to statically initialize the arena with hard alignment, move buffers from PSRAM to DRAM, use CAMERA_GRAB_WHEN_EMPTY, and avoid trying to handle "two cameras" with different modes. After that, the bug disappeared, and predictions became correct again.
Memory is a treasure trove of problems. Make sure you understand where static and dynamic memory is stored, what happens during a power cycle, peripheral deinitialization, and so on.
- FreeRTOS, stability, MQTT and backend connectivity
I moved FreeRTOS tasks to the first core and reduced the button stack size. This freed up resources for two cameras and stabilized the inference at 15 kHz. The resulting structure became MCU → MQTT → backend (Actix Web) → frontend.
I implemented minute-based throttling: predictions are sent only when the minute changes (without timers), simply based on the current time change. This reduced the load on the network and server and made updates more meaningful.
DevJournal: Principles and Example
It's important to me that the hardware drivers, logic modules, and firmware (Rust + esp_idf_hal) are organized in a modular and extensible manner: each component is isolated, built on abstraction layers and the principle of loose coupling.
The code is structured so that commands and requests are separated, and the module code structure follows the logical flow of the device.
This architecture reduces the firmware size, improves its testability, ensures performance monitoring, and allows for easy integration of the AI model into the overall processing pipeline.
Project file structure:
components/
 ├── esp-tflite-micro-wrapper/
 │    ├── esp_tflite_micro_wrapper.cpp
 │    ├── model_data.cpp
 │    ├── model_data.h
 └──  └── CMakeLists.txt
model/
 └── model.tflite
src/
 ├── app/
 │    ├── mod.rs
 │    ├── app.rs
 │    ├── processing.rs
 |    ├── qr_connection.rs
 |    └── state.rs
 ├── drivers/
 │    ├── mod.rs
 │    ├── camera.rs
 │    ├── lcd.rs
 │    └── tflite.rs
 ├── services/
 │    ├── mod.rs
 │    ├── nvs_storage.rs
 │    └── wifi.rs
 ├── utils/
 │    ├── mod.rs
 │    └── time_utils.rs
 ├── main.rs
 └── config.rs
 Cargo.toml
 CMakeLists.txt
 build.rs
 rust-toolchain.toml
 sdkconfig.defaults
1.1 app/ - the main loop and device operation logic
The app folder contains the main firmware loop (app.rs). This is where the MCU peripherals are initialized, serial interfaces are launched, the Wi-Fi and MQTT modules are prepared, and the configuration is loaded.
This is also where the .tflite model is loaded into memory. After health checks, execution moves to the main closed loop, where the processing module is called and data is sent to the queue.
I separated the logic for connecting to the user's Wi-Fi network into a separate module: during NVS startup and initialization, if no settings are saved, the device prompts the user to show the network's QR code to the camera. After a successful connection, the data is saved in NVS and automatically loaded the next time the device is powered on.
1.2 drivers/ - hardware drivers
This directory contains modules that enable the firmware to interact with external components. - lcd.rs - OLED display initialization and page-by-page text output.
- camera.rs - Extended camera initialization in two modes: QVGA (320×240) for QR code reading and QQVGA (160×120) for ML processing.
- tflite.rs - A bridge between the Rust and C++ components of the model via FFI. Unsafe wrappers call functions from
esp_tflite_micro_wrapper.cpp, allowing you to initialize the model, allocate an arena, run inference, and obtain debug information about the model at runtime.
1.3 services/ - network services
Modules in services are responsible for connecting to Wi-Fi and managing network data in the NVS: retrieving, rewriting, and validating the network configuration. The logic in this layer is completely separated from the main firmware loop.
1.4 utils/ - auxiliary tools
- time_utils.rs - contains the
TimeUtilsstructure with methods for waiting for time synchronization and retrieving the current time in UTC in the"MM/DD HH:MM"format.
1.5 config.rs - single configuration node
This file contains three key structures with dynamic firmware settings:
ModelConfig- frame processing parameters: brightness thresholds, hysteresis, number of averaging frames, update intervals, delays, etc.WifiConfig- network connection data.MqttConfig- MQTT client endpoints and parameters.
1.6 main.rs - entry point
Minimal code that sets logging levels, allocates a thread with an increased stack, and transfers control to app.rs. The main logic has been moved out of main.rs to keep the file lightweight and clean.
1.7 build.rs - external component connections
This file contains paths to external dependencies of build/esp-idf/esp-tflite-micro-wrapper
It ensures the building and linking of the C++ components of the model into the final binary.
1.8 sdkconfig.defaults - default MCU settings
Centralized override of ESP-IDF settings. This is a convenient alternative to manually editing sdkconfig or configuring via idf.py menuconfig.
1.9 app/processing.rs - the core of the processing pipeline
- receives frames from the camera
- validates them
- performs preprocessing:
dynamic_brightness_threshold,normalize_frame,gaussian_blur_3x3,sharpen_frame - passes the result to the model
- receives the prediction
- calculates statistics (averages, smoothing, hysteresis)
- updates
ModelConfigparameters - renders the UI
pub fn process_cycle(
i2c: &mut I2cDriver,
detector: &mut PersonDetector,
state: &mut AppState,
config: &ModelConfig,
time_str: &str,
) -> Option<(f32, &'static str)>
The result of the function is An option that, when certain conditions are met, is published to the mqtt topic device/{}/stats in the format:
device/UM001/stats Time: 12/03 12:24, AvgScore(5): 0.87, LastScore: 0.99, Label: human
What's next
In the next article, I'll move on to ML organization.
I plan to briefly cover the entire ML life cycle, from basic concepts and data preparation to model conversion and deployment on the MCU.