CPU–Peripheral I/O Communication: Approaches and Trade-offs

🟠 Data Transmission Between CPU and Peripheral Devices via I/O Methods

Read more  ↩︎

MMIO (Memory-Mapped I/O)

MMIO (Memory-Mapped I/O) is a way for the central processing unit (CPU) to interact with peripheral hardware devices (e.g. UART, timers, GPIO, SPI, etc.) by "sticking" the registers of these devices to specific addresses in the CPU memory.
These addresses in the CPU do not store regular data, but allow reading and writing to the device control registers.
This means that the peripheral device can be accessed in the same way as regular memory - via regular memory read/write instructions (LDR, STR, MOV, etc.). at specific addresses.

How does it work inside CPU?

  1. The CPU has a single address bus, which is used to access both RAM and MMIO devices.
  2. When the CPU accesses an address that belongs to the MMIO area:
    • In this case, the control logic understands that this is not ordinary memory, but a device register.
    • Signals go to the periphery, not to RAM/ROM.

🧷 Key features

  • It is necessary to work through volatile, so that the compiler does not optimize access to the device.
  • Addresses and devices are specified by the platform manufacturer (e.g. ARM Cortex-M, x86)
Characteristic volatile atomic mutex
Scenario Read/write MMIO registers
Check flag or register status
Interthread counter, ready flag
Safe logical condition (compare, increment)
Work with buffer, list, structure
Ensures visibility of changes βœ… Yes (to the compiler) βœ… Yes (across threads/cores) βœ… Yes
Ensures atomicity ❌ No βœ… Yes (e.g., fetch_add) βœ… Yes (via locking)
Protects from data races ❌ No βœ… Yes (on primitive types) βœ… Yes (on any resource)
Blocks other threads ❌ No ❌ No βœ… Yes
Supports complex operations ❌ No ⚠️ Limited (e.g., arithmetic, flags) βœ… Yes (conditions, buffers, etc.)
Use in Embedded βœ… MMIO (memory-mapped I/O) βœ… Counters, flags, semaphores βœ… RTOS, critical sections
Rust usage ptr::read_volatile, PAC core::sync::atomic::* critical-section, Mutex<T>
Performance πŸ”‹ Fast ⚑ Fast 🐒 Slower (due to blocking)

πŸ”Έ volatile

Compilers like to optimize code: if a variable doesn't change in the current context, they can not re-read it.

  • The device can change the register itself
  • The variable can change in another context

volatile tells the compiler: "don't optimize access to this variable - read/write it each time, because it can change at any time outside the current code."

  • It is only used with MMIO.
  • Rust doesn't have a built-in volatile keyword, but provides functionality via core::ptr and volatile-safe types:
use core::ptr::{read_volatile, write_volatile};
// unsafe is required for any direct volatile access
let ptr = 0x4000_0000 as *mut u32;
// Write the value without buffering
unsafe {
write_volatile(ptr, 0x1234);
}
// Read the value with optimizations disabled
let value = unsafe {
read_volatile(ptr)
};

πŸ”Έ atomic

  • Provides atomic access to data (e.g. counters, flags).
  • Suitable for thread synchronization on multiprocessor systems.
  • Can be used without locks (lock-free).
  • AtomicBool, AtomicU8, AtomicUsize, etc.
use core::sync::atomic::{AtomicBool, Ordering};

static READY: AtomicBool = AtomicBool::new(false);

fn main() {
    READY.store(true, Ordering::Release);
    if READY.load(Ordering::Acquire) {
        // safe to read
    }
}

πŸ”Έ mutex

  • Provides mutual exclusion.
  • Suitable for large objects consisting of many variables or structures.
  • More commonly used in multitasking systems (RTOS, OS).
  • In embedded:
    • critical-section (interrupt lock),
    • Mutex from embassy, ​​RTIC, or spin::Mutex without an OS.
use critical_section::Mutex;
use core::cell::RefCell;

static SHARED: Mutex<RefCell<Option<u32>>> = Mutex::new(RefCell::new(None));

fn example() {
    critical_section::with(|cs| {
        *SHARED.borrow(cs).borrow_mut() = Some(42);
    });
}

Cross-compiling


Debugging firmware

Classic software development is always inside the cycle of write - run - check - fix.
In classic systems, debugging is simplified by built-in logs, breakpoints and step-by-step code execution directly in the IDE.

When developing programs for microcontrollers, debugging is significantly more complicated since the code is written on a PC and executed on a device with a completely different architecture.
Obtaining debug information, setting breakpoints, accessing registers and local variables require a special environment and integration of tools, and the process itself becomes much less obvious.
🟠 In this article I want to describe the standard process when debugging software running on a microcontroller and describe the tools that play a key role in this.

Read more  ↩︎

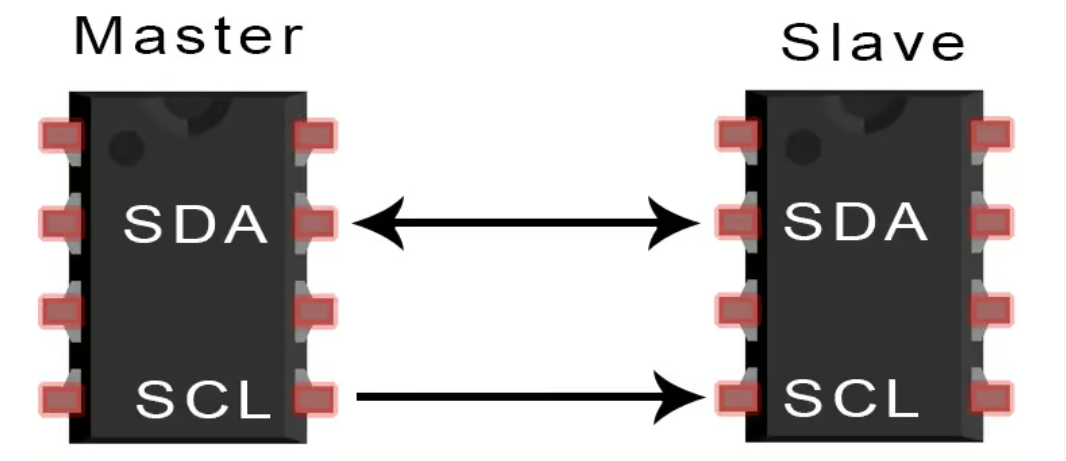
I2C (Inter-Integrated Circuit)

A technical introduction to the I2C - low-speed two-wire master-slave serial protocol.
I2C is widely used for short-distance data transmission over a data bus (SDA) with a clock synchronization line (SCL).

Read more  ↩︎

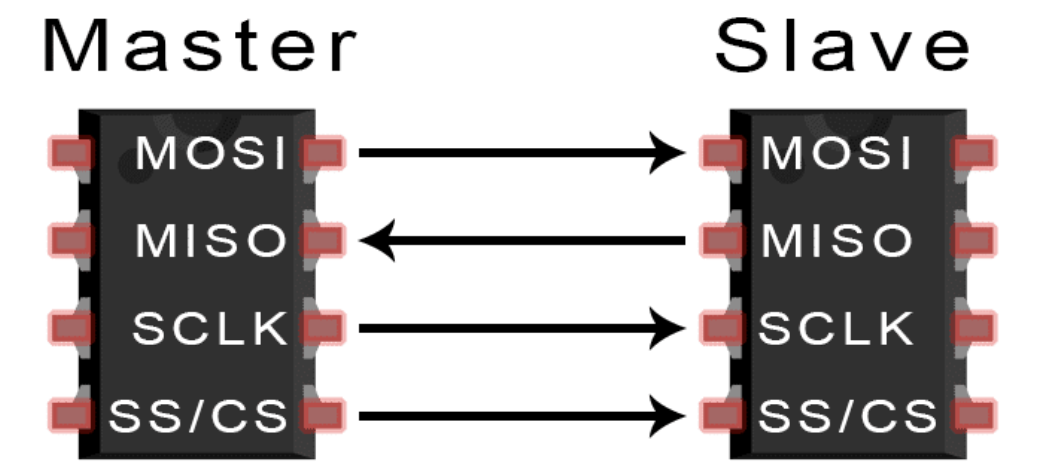
SPI (Serial Peripheral Interface)

A technical introduction to the SPI - low-speed four-wire master-slave full-duplex serial protocol.
SPI is widely used as a faster alternative to UART/I2C for transferring data between an intelligent controller and a less intelligent peripheral device.

Read more  ↩︎

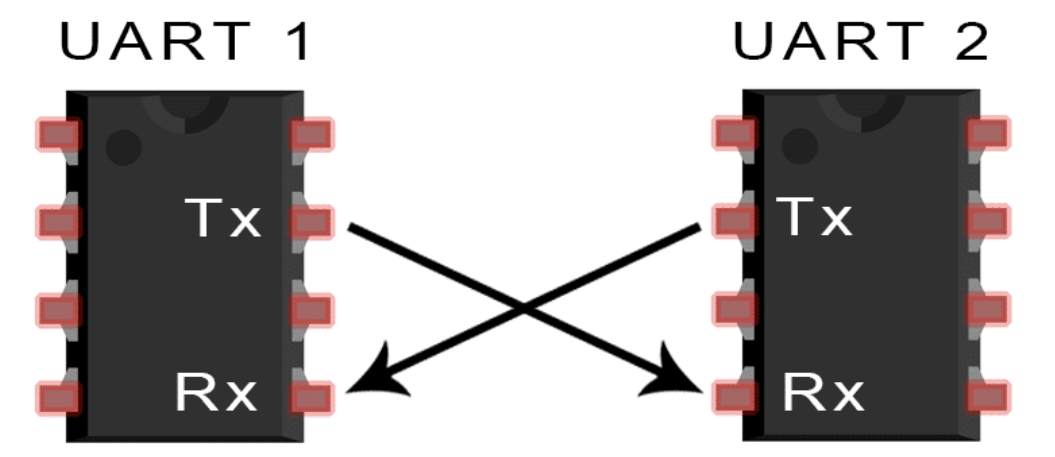
UART (Universal Asynchronous Receiver / Transmitter)

A technical introduction to the UART - low-speed two-wire asynchronous multi-duplex serial protocol.
UART The earliest serial protocol. Still commonly used in modern electronics.

Read more  ↩︎

Serial Protocols

Digital systems are based on the concept of bits, in addition to using bits they often have to transfer them back and forth usually between two components (MCU and Sensor, LCD etc).
🟠 All the different methods of bit transfer can be divided into 2 categories - Parallel and Serial transfer

Read more  ↩︎

Embedded πŸ“¦ crates ecosystem

Review of the ecosystem of crates used for programming microcontrollers in Rust

In general, developing programs for MCU is aimed at obtaining some information from the surrounding world, performing necessary calculations with this data and interacting back. Using Rust gives a huge freedom in choosing the level of abstraction at which the developer can interact with the MCU.

🟠 In this article I'll take a closer look at these abstraction levels and some other useful crates.

β”Œβ”€β”€β”€β”€β”€β”€β”€β”€β”€β”€β”€β”€β”€β”€β”€β”€β”€β”€β”€β”€β”€β”€β”€β”€β”€β”€β”€β”€β”€β”€β”€β”€β”€β”€β”€β”€β”€β”€β”€β”€β”€β”€β”€β”€β”€β”€β”€β”€β”€β”€β”€β”€β”€β” β”‚ BSP (Board Support Package) β”‚ β—€β–Ά Specific board (pins, display, LED, etc.) β”‚ └─ Peripheral configuration, pins, displays β”‚ β”œβ”€β”€β”€β”€β”€β”€β”€β”€β”€β”€β”€β”€β”€β”€β”€β”€β”€β”€β”€β”€β”€β”€β”€β”€β”€β”€β”€β”€β”€β”€β”€β”€β”€β”€β”€β”€β”€β”€β”€β”€β”€β”€β”€β”€ β”‚ Embedded HAL β”‚ β—€β–Ά Traits for Cross-Platform Compatibility β”‚ └─ Common Interfaces (digital::OutputPin) β”‚ β”œβ”€β”€β”€β”€β”€β”€β”€β”€β”€β”€β”€β”€β”€β”€β”€β”€β”€β”€β”€β”€β”€β”€β”€β”€β”€β”€β”€β”€β”€β”€β”€β”€β”€β”€β”€β”€β”€β”€β”€β”€β”€β”€β”€β”€β”€β”€ β”‚ HAL (Hardware Abstraction Layer) β”‚ β—€β–Ά Simplified management of timers, GPIO, UART β”‚ └─ Implementation of embedded-hal traits via PAC β”œβ”€β”€β”€β”€β”€β”€β”€β”€β”€β”€β”€β”€β”€β”€β”€β”€β”€β”€β”€β”€β”€β”€β”€β”€β”€β”€β”€β”€β”€β”€β”€β”€β”€β”€β”€β”€β”€β”€β”€β”€β”€β”€β”€β”€ β”‚ PAC (Peripheral Access Crate) β”‚ β—€β–Ά SVD-based API generation β”‚ └─ Direct access to registers, type-safe β”œβ”€β”€β”€β”€β”€β”€β”€β”€β”€β”€β”€β”€β”€β”€β”€β”€β”€β”€β”€β”€β”€β”€β”€β”€β”€β”€β”€β”€β”€β”€β”€β”€β”€β”€β”€β”€β”€β”€β”€β”€β”€β”€β”€β”€ β”‚ SVD (System View Description) β”‚ β—€β–Ά XML description of all registers, their bits and fields β”‚ └─ Basis for PAC autogeneration (via svd2rust) β”œβ”€β”€β”€β”€β”€β”€β”€β”€β”€β”€β”€β”€β”€β”€β”€β”€β”€β”€β”€β”€β”€β”€β”€β”€β”€β”€β”€β”€β”€β”€β”€β”€β”€β”€β”€β”€β”€β”€β”€β”€β”€β”€β”€β”€β”€ β”‚ Register Management (Low Level) β”‚ β—€β–Ά Working directly with addresses and registers via unsafe β”‚ └─ Working with MMIO, volatile, bitmasks β”‚ β””β”€β”€β”€β”€β”€β”€β”€β”€β”€β”€β”€β”€β”€β”€β”€β”€β”€β”€β”€β”€β”€β”€β”€β”€β”€β”€β”€β”€β”€β”€β”€β”€β”€β”€β”€β”€β”€β”€β”€β”€β”€β”€β”€β”€β”€β”€β”€β”€β”€β”˜

Read more  ↩︎

πŸ§ͺ RP2040 Pico W Lab

Experiments, Prototypes & Notes with the Raspberry Pi Pico W

This repository contains my projects, experiments, and notes using the Raspberry Pi Pico W, built on the RP2040 microcontroller with integrated Wi-Fi.
It serves as a playground for testing ideas, learning embedded concepts, and building small prototypes.

Read more  ↩︎